Installing GTM on Shopify’s Checkout Extensibility
What’s happening?
Shopify has changed how its checkout manages third-party scripts. Historically Shopify ecommerce sites have used Checkout.liquid and added scripts to the code for measurement. However, Shopify is moving towards a new feature called Checkout Extensibility. To quote Shopify:
“In February 2023 we announced that checkout.liquid is deprecated, and that we’re moving to Checkout Extensibility, a new foundation for checkout that is more secure, performant, upgrade-safe, and customized using apps. Relying on obsolete checkout.liquid code past the deadlines below poses risks that may impact your business.”
Important Dates
August 13, 2024: Deadline to upgrade your Information, Shipping, and Payment pages. Automatic upgrades begin on January 6, 2025, and all checkout.liquid customizations for these pages will be lost.
August 28, 2025: Deadline to upgrade Thank you and Order status pages, including your apps using script tags and additional scripts.
Custom Pixels
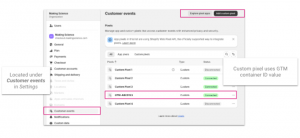
Checkout Extensibility forces Google Tag Manager (GTM) to be implemented in a custom pixel. These can be created in the Settings section of your Shopify Plus account.
Adding Google Tag Manager
Firstly, copy the container snippet from GTM. Then to add the GTM container script to Shopify, select the ‘Add custom pixel’ button and past the code into the pixel.
Starting a custom pixel with console.log message will enable you to confirm the script is being loaded.
With that the foundation of GTM on Shopify is complete. We still need to cover a few topics to complete the setup.
- Add Consent Mode
- Enable debugging
- Subscribe to events
Configure Consent Mode for GTM on Shopify’s Checkout Extensibility
One of the bigger challenges for Checkout Extensibility is configuring Consent Mode in GTM. For Consent Mode to work the values need to be sent within the custom pixel. Setting default values is easy enough, Consent Mode default values can be passed above the GTM container snippet. This is simple to do but implies the User’s consent is denied. Shopify’s official document sets granted as default – this is bad practice. The better approach is to set denied and then check for the user’s current consent state. To do this we need to accomplish two things:
- Set consent as denied
- Retrieve the user’s consent
- Set the Consent Mode consent update functionality
Set Default Consent Mode Status
Set the default Consent Mode status, this is placed above the GTM script. Adjust the settings to suit your operating requirements.
Retrieve User’s Consent Status
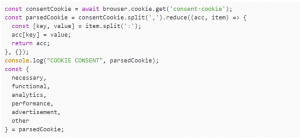
The user’s consent status can be retrieved from a cookie, it must be in a cookie. Shopify’s sandbox environment means that Consent Management Platforms (CMPs) using localStorage cannot be read. Secondly the cookie value must be sent to the domain, rather than each subdomain. The consent cookie should be set to .example.com rather than www.example.com.
With this in place the consent can be retrieved from within the custom pixel.
Update Consent Mode Status
Having retrieved the consent values from the cookie, the final step of the consent process can be completed and the Consent Mode gtag update values can be set.
With the GTM script already in place, it is now possible to check that Consent Mode is working correctly by reviewing the console.log and checking the gcs parameter value in the GA4 network requests.
Configure an E-Commerce Datalayer for Shopify’s Checkout Extensibility
Part three of our Checkout Extensibility masterclass is to add the ecommerce object and dataLayer to our custom pixel GTM script.
How Shopify provides data
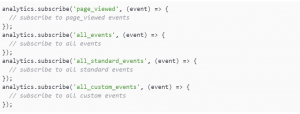
Shopify has an Analytics API that has a number of events that can be subscribed to. When first using the API, subscribing to all events is useful to see what fires and when during the checkout process. It is good to make a note of this for your internal analytics documentation.
Each Shopify event has a data object containing data about the event, the page, etc. It is good to review these to see how Shopify builds its data structure and the values that are being passed for products, etc. Adding a variable called shopify.data and logging it to the console.
The output of which will be in the console when each event fires.
Calling Events
Events can be set up in two ways. There is “the way” but having experienced problems with the purchase event in the past, there is also an alternative. The preferred approach is to request only the event you require.
The alternative is to request all events and then use an if function to work with the event you need.
Configuring Page Views
The checkout is a single-page application (SPA) – it doesn’t send page views itself and needs either History Change enabled or a page_view event to be sent to the dataLayer. Fortunately there is a page_viewed event that can be subscribed to via the API that also contains all the details needed to create your own page_view event.
This unfortunately leads to a mess as page_views during the checkout don’t necessarily match the displayed URL and are not useful for humans.
Creating your own page views
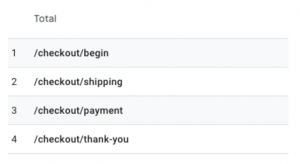
A useful approach to get a full picture of the checkout funnel and user journey is to write your own and send them with the checkout events. For example:
| SHOPIFY EVENT | GA4 EVENT | PAGE PATH |
| checkout_started | begin_checkout | /checkout/begin |
| checkout_shipping_info_submitted | add_shipping_info | /checkout/shipping |
| payment_info_submitted | add_payment_info | /checkout/payment |
| checkout_completed | purchase | /checkout/thank-you |
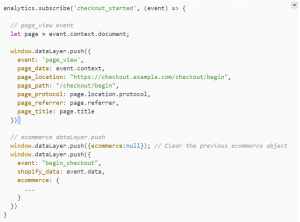
These can then be sent as part of each ecommerce event. The output will be 2 dataLayer pushes per ecommerce event – 1 sending the page view, 1 sending ecommerce data.
This will result in nice clean page_views appearing in your analytics account and be easy to understand for all users.
Locating Product Data
The first challenge when creating an ecommerce dataLayer in Checkout Extensibility is understanding the products object. This varies depending on the event that has been fired.They are split by:
- collection_viewed
- cart_viewed
- Checkout events (checkout_started, purchase, etc.)
There is an element of sifting through the data to find the value you require but it is important to get a consistent ID for each step that can try each item together across the checkout process.
| Shopify Event | Item data location | Notes |
| collection_viewed | collection.productVariants | |
| cart_viewed | cart.lines | Item data is split across different sections. cart.lines.merchandise.product contains product ID and name. Price is found under cart.lines.cost.totalAmount.amount |
| Checkout events | checkout.lineItems | Item data is stored under the variant. checkout.lineItems.variant.product. Price data is found item.variant.price.amount |
Building a Products Array
The most efficient way to pull in products is to create a function that will map the products data to your liking. This is done outside of the analytics subscribe events and will then be called from each event. A function is needed for each source data type:
- collection_viewed => createCollectionItemsArr
- cart_viewed => createCartItemsArr
- Checkout events => createCheckoutItemsArr
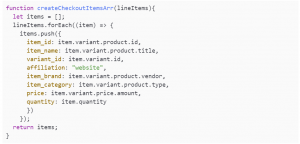
The function is just mapping existing data. Using a GA4 ecommerce dataLayer as the template, a checkout items function will look like:
The values for each variable will need updating for each function but the format will stay the same.
Using the Items Array Function in your Event
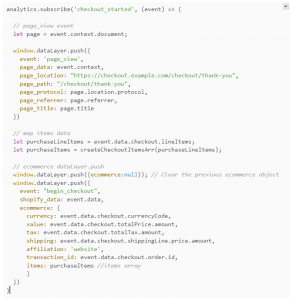
The final part is to call the items array as part of your function and map the remaining ecommerce attributes that are not item specific, e.g. currency, order_id, etc.
This will produce an analytics subscribe event that looks like:
Review the console logs, network requests and analytics data to confirm everything is being collected correctly.
Summary
Getting the Shopify Checkout Extensibility GTM pixel set up correctly can be a challenge. The key is to enable logging to make troubleshooting easier and remember the order of code snippets:
- Consent Mode default values
- Cookie consent values
- Consent Mode update values
- GTM container snippet
- Items array functions
- Analytics.subscribe events
Happy tagging!









 Cookies configuration